Owl Lantern
What you need:
- Yellow tissue paper (12 x 24 inches)
- Tracing paper
- Pencil
- Scissors
- Thin cardboard
- Glue stick
- Red, brown, yellow and orange tissue paper
- 4 small bowls
- Coin
- Ballpoint pen
- 1 strip of orange drawing paper (5x20inches)
- Ruler
- Roll of double-sided tape
- Tea light
- String
How to make your Owl Lantern step by step
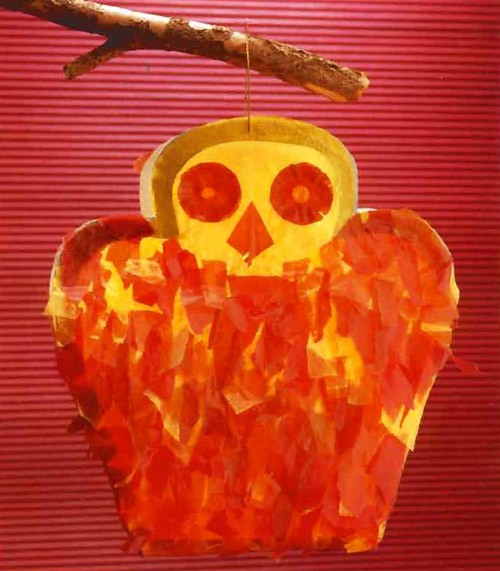
- Begin by duplicating the body of the owl on thin cardboard and cut out a backside and a front side. Then cut out the inner owl leaving a 2 inch boarder (inspire yourself with the picture above).
- Trace the owl body on yellow tissue paper and glue to the outline of the owl body made of thin cardboard for both sides.
- Take the red, brown, yellow and oragne tissue paper and tear small pieces with a narrow end or in a point. Place these pieces into bowls separating the colors.
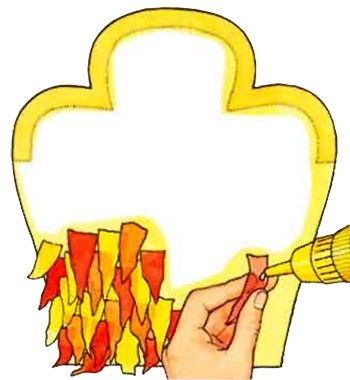
- Now you will glue the torn pieces of tissue onto the front side of the owl body to create a look of his feathers. Mix the colors and keep the ends of the owl feathers free of glue to give a 3 dimensional appearance to the bird.
- For the owl eyes, take a coin like a quarter size and trace it onto the brown tissue paper repeating this procedure 4 times and cut out the circles.
- Place two circles on top of each other before folding them in half, then into quarters.
- Firmly hold the central portion and cutting thin fringes with scissors leaving the rounded edge. The fringes should stop half-length.
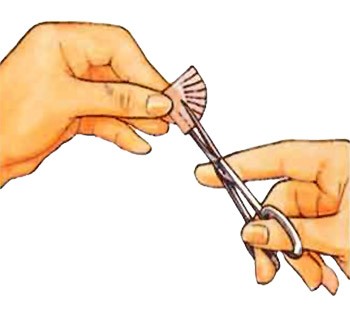
- Cut the very end of the tip to create the pupil. Then unfold the circle carefully. There is now a hole: the pupil of the eye. Between the two circles, glue a piece of orange tissue paper on the pupil of the first element and the second adhesive on top. One eye is completed. Reapeat to make the second eye.
- When both eyes are ready, place them on the part of the owl for the face and glue. Warning: do not put glue on the fringes around the eyes.
- Now for the owl beak. For this, you need a square about 1 inch square. Fold it in two opposite corners by folding one on the other.
- The lower edge flaps on the side to about halfway up and smooth out the crease. Then again unfold the square.
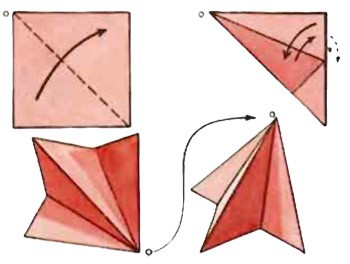
- The center fold is the bridge of the nose. Smear glue on the two side of the triangles and glue them in the middle of the owl's face. Both sides of the bird is ready.
- Now construct the central portion of the lantern. Take the strip of orange drawing paper, measure 7 inches from each end and make marks. The central part is 6 inches long. The two side folds upwardly along the guide portions. Strip 6 inches at the bottom of the lantern and two strips of 7 inches form the sides.
- To assemble the owl, collapse a tab inward of about 1/2 inch wide on both long sides.
- With scissors, cut small triangles from the edge to the fold of the two long sides.
- Begins to assemble the lantern. Place the front of the owl on the table before you, the feathery side facing down. Smear glue on the tabs and the central portion of one of the sidebands of orange paper. Then press the strip against the toothed edge of the owl. The tabs must be firmly glued, one after the other.
- Now, place the backside of the owl on the table in front of you and attach it in the same way with the glued tabs. Place a tealight in the bottom of the lantern. Pushes the wire at the top of the head of the owl and its end curls up.
- Now you are ready to hang your owl lantern.


