Easter bunny beaded board
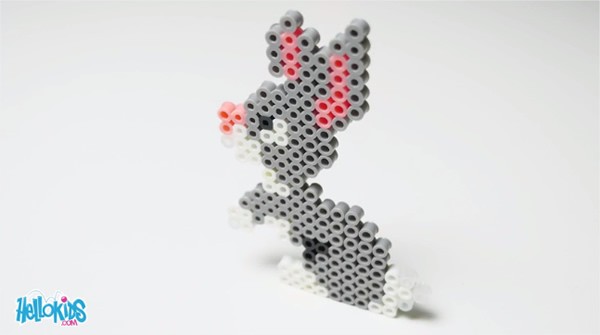
Video tutorial on how to make a cute Easter bunny with ironing beads. The rabbit is a good symbol of the celebration of Easter like decorated eggs, chickens, or fish. The rabbit model made with Hama beads is very simple to create. You can make several to hang along a branch or just put them on the table. Spring colors are warm, do not hesitate to call on your creativity and good taste to create other rabbits in multiple colors!
Materials needed
- a pearl kit board
- pearl beads of many colors
- tweezers
- a sheet of bead paper board
- iron
- a big book
Age: from 7 years old, requires the help of an adult to do the ironing step
Time: 15 minutes
How to create an Easter bunny beaded board
This creative activity of Easter requires concentration and attention to detail, choose a quiet place where you will be sitting comfortably before beginning.
- Connect the iron.
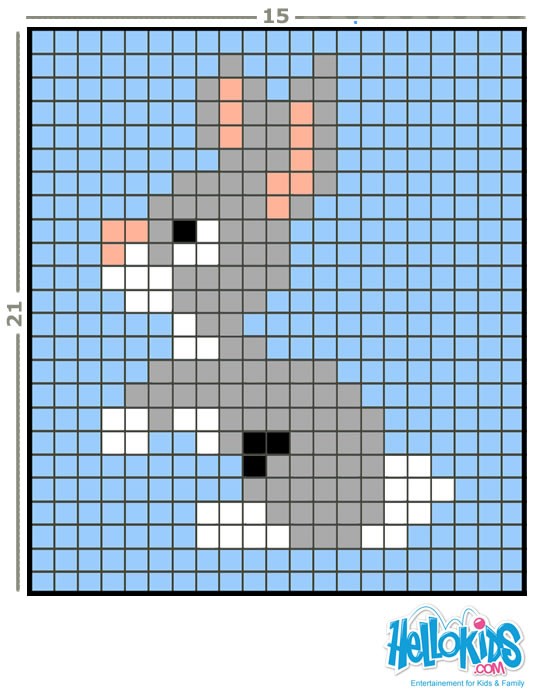
- Print the rabbit model that is at the bottom of the page.

- Start by placing the mounting pan of Hama beads on a flat surface near an electrical outlet.
- Identify the number of beads needed for the height and width of the rabbit (that is written on the model) and start placing the beads one by one using the tweezers.
- To give some volume to the ends of the tail and legs of the rabbit replace some white beads by transparent beads. You can also easily replace the gray for another color.
- After the Easter Bunny is finished, place the paper on the figurine and board for 1 a minute, making small circles. Remove the paper, turn the rabbit, position paper and board again on the other side.
- Remove the paper and without waiting, place a large book on the rabbit while the rabbit is still hot. Leave the book on for 2 to 3 minutes to prevent cooling curves.
You have created an Easter bunny! You can also do more to merge the beads and make disappear the small holes doubling ironing time on each side. The rabbit will be different but equally charming. 


